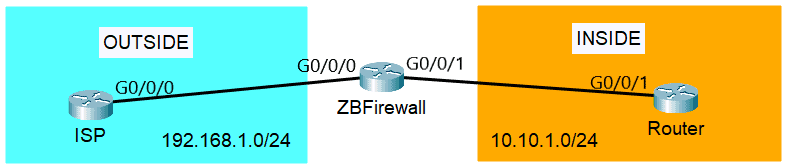
For our zone-based firewall Cisco configuration, we will use the topology below. We have three routers here, the ISP router, our zone-based firewall (ZBFirewall), and the LAN router (Router). We will create two zones, the OUTSIDE security zone which includes the public ISP connectivity, and the INSIDE security zone which includes the traffic going towards our private LAN.
Zone Configuration
After configuring the interfaces and the routes, first, we have to create the security zones on ZBFirewall, the zone-based firewall Cisco router. We will set the security zone names as OUTSIDE and INSIDE.
ZBFirewall(config)#zone security OUTSIDE
ZBFirewall(config-sec-zone)#exit
ZBFirewall(config)#zone security INSIDE
ZBFirewall(config-sec-zone)#
Then, assign the interfaces to the zone they belong to. Interface G0/0/0 is connected to the ISP, so it belongs to the OUTSIDE zone and G0/0/1 is connected to the LAN Router at the INSIDE zone.
ZBFirewall(config)#interface G0/0/0
ZBFirewall(config-if)#zone-member security OUTSIDE
ZBFirewall(config-if)#exit
ZBFirewall(config)#interface G0/0/01
ZBFirewall(config-if)#zone-member security INSIDE
Now, we have to configure two zone pairs. Our first security zone pair name is IN-to-OUT, that’s for the traffic from INSIDE going to OUTSIDE. The next one is OUT-to-IN for the traffic OUTSIDE going to INSIDE. Optionally, we can add a description for the zone pair. This is helpful when there are lots of zone pairs.
ZBFirewall(config)#zone-pair security IN-to-OUT source INSIDE destination OUTSIDE
ZBFirewall(config-sec-zone-pair)#description INSIDE TO OUTSIDE TRAFFIC
ZBFirewall(config-sec-zone-pair)#exit
ZBFirewall(config)#zone-pair security OUT-to-IN source OUTSIDE destination INSIDE
ZBFirewall(config-sec-zone-pair)#description OUTSIDE TO INSIDE TRAFFIC
To verify the configured zones, we can use the ‘show zone security‘ command. You can see that the self zone is defined automatically.
ZBFirewall#show zone security
zone self
Description: System defined zone

zone OUTSIDE
Member Interfaces:
GigabitEthernet0/0/0

zone INSIDE
Member Interfaces:
GigabitEthernet0/0/1
To check the configured zone pairs, we can use the ‘show zone-pair security‘ command:
ZBFirewall#show zone-pair security
Zone-pair name IN-to-OUT
Description: INSIDE TO OUTSIDE TRAFFIC
Source-Zone INSIDE Destination-Zone OUTSIDE
service-policy not configured

Zone-pair name OUT-to-IN
Description: OUTSIDE TO INSIDE TRAFFIC
Source-Zone OUTSIDE Destination-Zone INSIDE
service-policy not configured
If we try sending traffic between the zones, it will fail by default. That is because we have to configure security policies to decide what will happen to the traffic. You can see below that if we ping the LAN Router at 10.10.1.2 from the ISP router, it fails.
ISP#ping 10.10.1.2
Type escape sequence to abort.
Sending 5, 100-byte ICMP Echos to 10.10.1.2, timeout is 2 seconds:
.....
Success rate is 0 percent (0/5)
Security Policy Configuration
The next thing we have to do is to configure the security policies. The class-map is used to classify the traffic and it is configured by using the command ‘class-map type inspect‘. You can see below the keywords that we can use.
ZBFirewall(config)#class-map type inspect ?
WORD class-map name
match-all Logical-AND all matching statements under this classmap
match-any Logical-OR all matching statements under this classmap
The ‘match-all‘ keyword requires all of the conditions listed in the class-map to match the network traffic. The ‘match-any‘ keyword on the other hand requires only one of the conditions in the class-map to qualify. If no keyword is specified, the ‘match-all‘ keyword is used by default.
For our example, we’ll create a security policy that will allow ICMP traffic from the INSIDE to the OUTSIDE security zone. We’ll give it a class-map name of ICMP, then we will set the class-map to match the ICMP protocol.
ZBFirewall(config)#class-map type inspect ICMP
ZBFirewall(config-cmap)#match protocol icmp
Now, we have to configure an inspection policy map with the name IN-OUT-ICMP. Then, we have to create policy criteria and define the class maps using the command ‘class type inspect <class-map name>‘.
ZBFirewall(config)#policy-map type inspect IN-OUT-ICMP
ZBFirewall(config-pmap)#class type inspect ICMP
ZBFirewall(config-pmap-c)#inspect
In our example configuration above, we used the ‘inspect‘ firewall action. We have to specify the firewall policy action to the class-map which is specified in the policy map. There are three firewall actions that we can apply to the traffic:
- Pass – forwards traffic from the source to the destination in one direction. A second policy is needed for the return traffic.
- Drop – discards traffic that matches the class map.
- Inspect – allows state-based traffic control. Permits and inspects traffic so that return traffic is allowed without needing a second policy.
Next, let’s apply the policy-map IN-OUT-ICMP to the zone pair IN-to-OUT using the ‘service-policy‘ command.
ZBFirewall(config)#zone-pair security IN-to-OUT source INSIDE destination
ZBFirewall(config-sec-zone-pair)#service-policy type inspect IN-OUT-ICMP
To verify, if we ping to the ISP router at 192.168.1.2 from the LAN Router, it will succeed.
Router#ping 192.168.1.2
Type escape sequence to abort.
Sending 5, 100-byte ICMP Echos to 192.168.1.2, timeout is 2 seconds:
!!!!!
Success rate is 100 percent (5/5), round-trip min/avg/max = 0/0/0 ms
But if we ping to the LAN Router at 10.10.1.2 from the ISP router, then it will fail as expected.
ISP#ping 10.10.1.2
Type escape sequence to abort.
Sending 5, 100-byte ICMP Echos to 10.10.1.2, timeout is 2 seconds:
.....
Success rate is 0 percent (0/5)
The inspection policy maps can be verified with the ‘show policy-map type inspect zone-pair‘ command.
ZBFirewall#show policy-map type inspect zone-pair sessions

policy exists on zp IN-to-OUT
Zone-pair: IN-to-OUT

Service-policy inspect : IN-OUT-ICMP

Class-map: ICMP (match-all)
Match: protocol icmp
Inspect

Class-map: class-default (match-any)
Match: any
Drop (default action)
0 packets, 0 bytes
Download our Free CCNA Study Guide PDF for complete notes on all the CCNA 200-301 exam topics in one book.
We recommend the Cisco CCNA Gold Bootcamp as your main CCNA training course. It’s the highest rated Cisco course online with an average rating of 4.8 from over 30,000 public reviews and is the gold standard in CCNA training:
