Remote access via virtual terminal or virtual tty (vty) lines can also be secured by configuring inbound and outbound Access Control Lists (ACLs). Inbound ACLs enable inbound connections to a Cisco device, router or switch, from a restricted list of IP addresses. On the other hand, outbound ACLs controls outbound access from Cisco devices. The best practice is to allow internal or trusted network IP addresses to access the vty lines.
ACL Configuration on VTY Lines
To configure standard or extended ACL on a vty line, we use the ‘access-class {access-list-number|access-list-name} {in|out}‘ configuration commands. We enter the command under the vty line configuration mode.
For our example, we have routers R1, R2, and R3 here. We want R1 to allow connections with R2 but not with R3.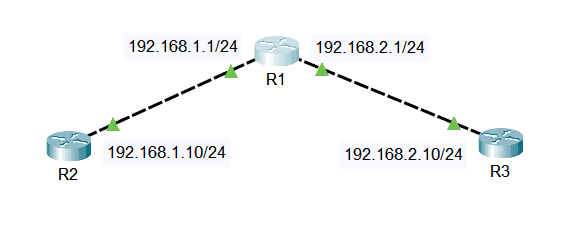
First, we have to create our access lists on R1’s global configuration mode. We will have two standard access lists, one to permit R2 at 192.168.1.10 and one to block R3 with an IP address of 192.168.2.10 for this example. We will use the access list number 1. Enter the following commands:
R1(config)#access-list 1 permit 192.168.1.10
R1(config)#access-list 1 deny 192.168.2.10
Then, we will apply the ACL we’ve created to the vty lines to permit Telnet or SSH traffic. We will use the ‘access-class’ command under the vty line configuration mode. We have to specify the access list number, which is 1, and we will use the keyword ‘in’ for inbound ACL. This is to control inbound Telnet connections. Enter configuration commands one per line:
R1(config)#line vty 0 4
R1(config-line)#access-class 1 in
R1(config-line)# exit
Verifying ACL Access on VTY Lines
To view the configurations under the vty lines, we can use the ‘show running-config | section line vty’ command.
R1# show running-config | section line vty
line vty 0 4
access-class 1 in
login local
To check our vty connectivity, we can use Telnet or SSH (Secure Shell). In our example, we will use Telnet protocol to verify the vty access to R1 via R2. We set the username as ‘study’ and configure passwords ‘ccnp’ and enable password ‘cisco’ beforehand.
R2#telnet 192.168.1.1

Trying 192.168.1.1 ...Open

User Access Verification

Username: study
Password:

R1>en
Password:

R1#
You can see that the Telnet connectivity went through. Now, if we try to Telnet R1 via R3, it will fail.
R3#telnet 192.168.2.1
Trying 192.168.2.1 ...
% Connection refused by remote host

R3#
R2 can Telnet to R1 because we have created an ACL to permit R2’s IP address to access R1 via vty. R3 cannot access R1 through its virtual terminal lines because we created and applied an ACL that blocks R3’s IP address.
Download our Free CCNA Study Guide PDF for complete notes on all the CCNA 200-301 exam topics in one book.
We recommend the Cisco CCNA Gold Bootcamp as your main CCNA training course. It’s the highest rated Cisco course online with an average rating of 4.8 from over 30,000 public reviews and is the gold standard in CCNA training:
