Cisco IP SLA enables continuous monitoring of network performance using numerous network parameters, and it supports static routes, policy-based routing (PBR), and dynamic routing protocols. Many types of probes may be configured to monitor traffic in a network environment which include:
- Delay
- Jitter
- Packet loss
- Packet sequencing
- Path
- Connectivity
- Website and server download time
- Voice quality scores
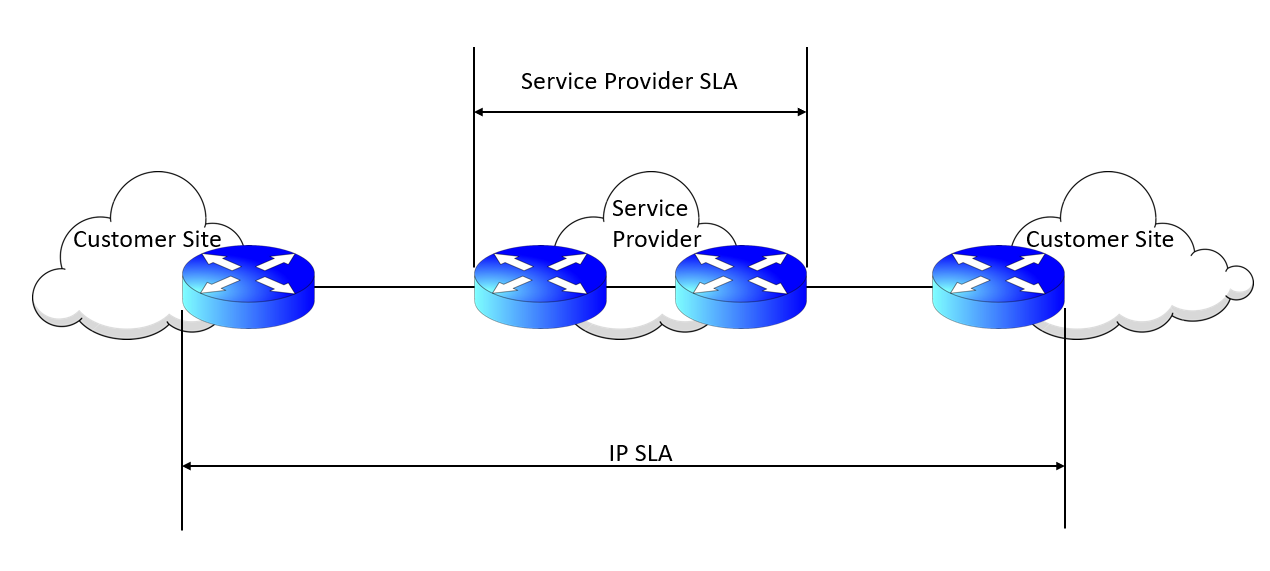
IP Service-Level Agreements offer several customizable network monitoring methods. Any SLA obtained from a service provider typically only monitors or ensures traffic as it traverses the service provider’s network, as shown in the image below. It does not deliver end-to-end SLA or visibility, but it can significantly help with troubleshooting.
IP SLA Configuration
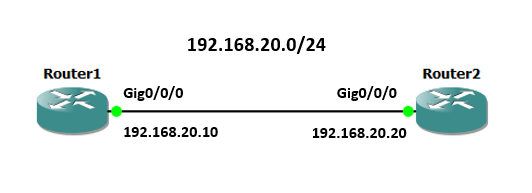
The ICMP echo operation can be considered testing reachability by utilizing ICMP echo and echo replies or pings. The topology below will be used for the Cisco IP SLA configuration example.
The ‘ip sla <operation-number>’ command is used to specify the individual IP SLA probe and to configure IP SLA operations. Multiple instances can be configured for different operations on a single device. The context of help ‘?’ is entered to check the supported operations:
Router1(config)#ip sla 1
Router1(config-ip-sla)#?
IP SLAs entry configuration commands:
dhcp DHCP Operation
dns DNS Query Operation
ethernet Ethernet Operations
exit Exit Operation Configuration
ftp FTP Operation
http HTTP Operation
icmp-echo ICMP Echo Operation
icmp-jitter ICMP Jitter Operation
mpls MPLS Operation
path-echo Path Discovered ICMP Echo Operation
path-jitter Path Discovered ICMP Jitter Operation
tcp-connect TCP Connect Operation
udp-echo UDP Echo Operation
udp-jitter UDP Jitter Operation
voip Voice Over IP Operation
In this example, icmp-echo will be configured. Enter the destination IP address of the monitored device or host using the command:
icmp-echo {<destination-ip-address> | <destination-hostname>} [source-ip {<ip-address> | <hostname>} | source-interface <interface-name>]
Next, define how often the ICMP echo operation should be performed using the ‘frequency <seconds>’ command. Then, schedule and activate the operation using the following command:
ip sla schedule <operation-number> [life {forever | <seconds>}] [start-time {[hh:mm:ss] [<month day> | <day month>] | pending | now | after <hh:mm:ss>}] [ageout <seconds>] [recurring]
The configuration on Router1 is as follows:
Router1(config)#ip sla 1
Router1(config-ip-sla)#icmp-echo 192.168.20.20
Router1(config-ip-sla-echo)#frequency 100
Router1(config-ip-sla-http)# end
Router1# configure terminal
Enter configuration commands, one per line. End with CNTL/Z.
Router1(config)#ip sla schedule 1 start-time now life forever
The configuration can be verified using the ‘show ip sla statistics’ command or the following command:
Router1#show ip sla configuration
IP SLAs Infrastructure Engine-III
Entry number: 1
Owner:
Tag:
Operation timeout (milliseconds): 5000
Type of operation to perform: icmp-echo
Target address/Source address: 192.168.20.20/0.0.0.0
Type Of Service parameter: 0x0
Request size (ARR data portion): 28
Verify data: No
Vrf Name:
Schedule:
Operation frequency (seconds): 100 (not considered if randomly scheduled)
Next Scheduled Start Time: Start Time already passed
Group Scheduled : FALSE
Randomly Scheduled : FALSE
Life (seconds): Forever
Entry Ageout (seconds): never
Recurring (Starting Everyday): FALSE
Status of entry (SNMP RowStatus): Active
Threshold (milliseconds): 5000
Distribution Statistics:
Number of statistic hours kept: 2
Number of statistic distribution buckets kept: 1
Statistic distribution interval (milliseconds): 20
Enhanced History:
History Statistics:
Number of history Lives kept: 0
Number of history Buckets kept: 15
History Filter Type: None
Using the same topology, let’s configure an HTTP operation on Router1. The HTTP GET probe will be configured using the command:
http {get | raw} <url> [name-server <ip-address>] [version <version-number>] [source-ip {<ip-address> | <hostname>}] [source-port <port-number>] [cache {enable | disable}] [proxy <proxy-ur>l]
Then, schedule and activate the operation. The configuration for the HTTP Get operation on Router1 is:
Router1(config)# ip sla 2
Router1(config-ip-sla)# http get http://192.168.20.20
Router1(config-ip-sla-http)# frequency 205
Router1(config-ip-sla-http)# end
Router1# configure terminal
Enter configuration commands, one per line. End with CNTL/Z.
Router1# ip sla schedule 2 start-time now life forever
Now, verify the HTTP operation configuration:
Router1# show ip sla configuration 2
IP SLAs Infrastructure Engine-III
Entry number: 2
Type of operation to perform: http
Target address/Source address: 192.168.20.20/0.0.0.0
Target port/Source port: 80/0
Type Of Service parameters: 0x0
Vrf Name:
HTTP Operation: get
HTTP Server Version: 1.0
URL: http://192.168.20.20
Proxy:
Raw String(s):
Cache Control: enable
Owner:
Tag:
Operation timeout (milliseconds): 60000
Schedule:
Operation frequency (seconds): 205 (not considered if randomly scheduled)
Next Scheduled Start Time: Start Time already passed
Group Scheduled : FALSE
Randomly Scheduled : FALSE
Life (seconds): Forever
Entry Ageout (seconds): never
Recurring (Starting Everyday): FALSE
Status of entry (SNMP RowStatus): Active
Threshold (milliseconds): 5000
Distribution Statistics:
Number of statistic hours kept: 2
Number of statistic distribution buckets kept: 1
Statistic distribution interval (milliseconds): 20
History Statistics:
Number of history Lives kept: 0
Number of history Buckets kept: 15
History Filter Type: None
Download our Free CCNA Study Guide PDF for complete notes on all the CCNA 200-301 exam topics in one book.
We recommend the Cisco CCNA Gold Bootcamp as your main CCNA training course. It’s the highest rated Cisco course online with an average rating of 4.8 from over 30,000 public reviews and is the gold standard in CCNA training:
