An IPsec Virtual Tunnel Interface (VTI) is a routable virtual interface type for terminating IPsec tunnels, and it provides a simple way to establish security between sites to create an overlay network. IPsec Virtual Tunnel Interfaces improve and simplify IPsec configuration using Virtual Private Network (VPN) tunnels.
VTI Over IPsec Configuration
There are two types of VTI, Dynamic Virtual Tunnel Interface (DVTI) and Static Virtual Tunnel Interface (SVTI). Only the static VTI configuration with IPSec session and normal tunnel interface will be explained here.
The network topology below shows two routers to be connected using static VTI over IPsec VPN. The configuration is pretty much the same with the GRE over IPsec using IPsec profiles configuration. The only difference is the additional ‘tunnel mode ipsec {ipv4 | ipv6}’ command under the GRE tunnel interface to enable VTI and to use tunnel mode instead of transport mode.
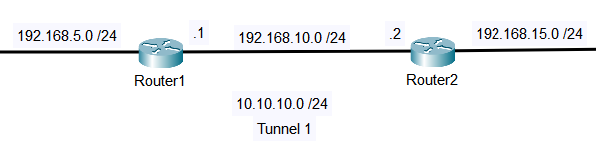
In the example, the IP addresses and the initial routes are already configured on both routers. So for the first step, configure an ISAKMP policy on Router1.
Router1(config)#crypto isakmp policy 1
Router1(config-isakmp)#encryption aes
Router1(config-isakmp)#authentication pre-share
Router1(config-isakmp)#group 14
Next, configure the Pre Shared Key (PSK). STUDY-CCNP is the keystring, and 192.168.10.2 is the peer-address.
Router1(config-isakmp)#crypto isakmp key STUDY-CCNP address 192.168.10.2
Create a transform set and set the mode to tunnel. T-SET is the transform set name, and esp-aes and esp-sha-hmac are the transforms inside the set.
Router1(config)#crypto ipsec transform-set T-SET esp-aes esp-sha-hmac
Router1(cfg-crypto-trans)#mode tunnel
Create an IPsec profile and select the transform set to be used by the profile. PROFILE is the IPsec profile name. The T-SET is the name of the transform set created in the previous step.
Router1(config)#crypto ipsec profile PROFILE
Router1(ipsec-profile)#set transform-set T-SET
Now, configure the tunnel interface.
Router1(config)#interface Tunnel 1
Router1(config-if)#ip address 10.10.10.1 255.255.255.0
Router1(config-if)#tunnel source 192.168.10.1
Router1(config-if)#tunnel destination 192.168.10.2
Then, under the tunnel interface mode, enable VTI and apply the IPSec profile using the following commands.
Router1(config-if)#tunnel mode ipsec ipv4
Router1(config-if)#tunnel protection ipsec profile PROFILE
For Router2, it’s pretty much the same.
Router2#configure terminal
Router2(config)#crypto isakmp policy 1
Router2(config-isakmp)# encryption aes
Router2(config-isakmp)# authentication pre-share
Router2(config-isakmp)# group 14
Router2(config-isakmp)#crypto isakmp key STUDY-CCNP address 192.168.10.1
Router2(config-isakmp)#exit
Router2(config)#crypto ipsec transform-set T-SET esp-aes esp-sha-hmac
Router2(cfg-crypto-trans)# mode tunnel
Router2(cfg-crypto-trans)# exit
Router2(config)#crypto ipsec profile PROFILE
Router2(ipsec-profile)# set transform-set T-SET
Router2(ipsec-profile)#exit
Router2(config)#interface Tunnel 1
Router2(config-if)# ip address 10.10.10.2 255.255.255.0
Router2(config-if)# tunnel source 192.168.10.2
Router2(config-if)# tunnel destination 192.168.10.1
Router2(config-if)# tunnel mode ipsec ipv4
Router2(config-if)# tunnel protection ipsec profile PROFILE
Also, make sure to configure the routes that point to the subnet on each side with the tunnel interface as the destination.
Router1(config)#ip route 192.168.15.0 255.255.255.0 Tunnel1
Router2(config)#ip route 192.168.5.0 255.255.255.0 Tunnel1
Verifying IPsec Virtual Tunnel Interface (VTI)
To verify the VTI over IPsec tunnel configuration, the command ‘show interface tunnel1’ can be used. It shows the tunnel status and type, the tunnel internet address, and the tunnel IPsec profile.
The ‘show crypto session’ command also shows the tunnel status and its peer.
Router1#show crypto session
Crypto session current status
Interface: Tunnel1
Session status: UP-ACTIVE
Peer: 192.168.10.2 port 500
Session ID: 0
IKEv1 SA: local 192.168.10.1/500 remote 192.168.10.2/500 Active
Session ID: 0
IKEv1 SA: local 192.168.10.1/500 remote 192.168.10.2/500 Active
IPSEC FLOW: permit ip 0.0.0.0/0.0.0.0 0.0.0.0/0.0.0.0
Active SAs: 6, origin: crypto map
Other useful show commands for verification are ‘show crypto isakmp sa’ and ‘show crypto ipsec sa’.
Download our Free CCNA Study Guide PDF for complete notes on all the CCNA 200-301 exam topics in one book.
We recommend the Cisco CCNA Gold Bootcamp as your main CCNA training course. It’s the highest rated Cisco course online with an average rating of 4.8 from over 30,000 public reviews and is the gold standard in CCNA training:
